GUI preprocessing#
Use the Preprocessing tab to convert DICOM data to NIfTI or resample images and masks to a target voxel spacing. The output can then be used for filtering or feature extraction.
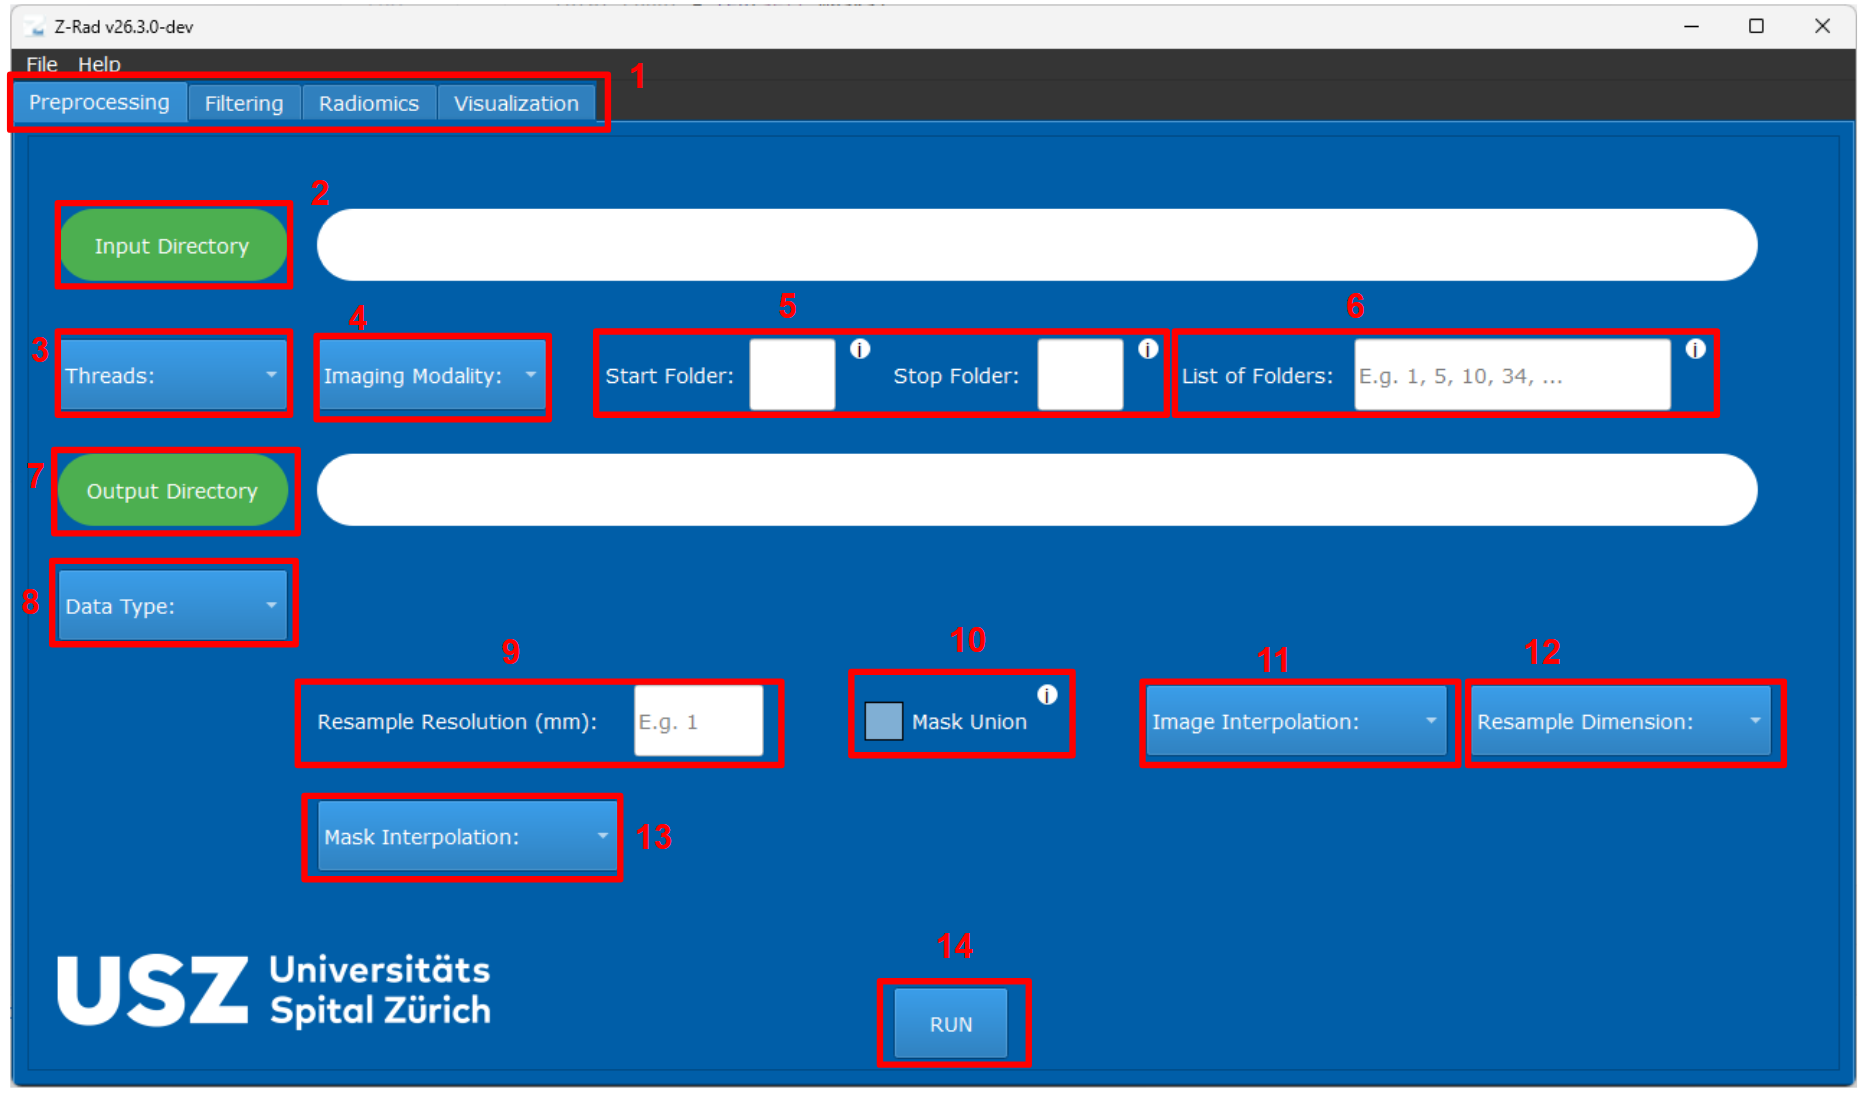
Preprocessing tab in the GUI.#
Main controls#
The numbers below match the annotated screenshot.
(1)Preprocessing tabUse the top tab bar to navigate between the main parts of the application. This page describes the controls shown when
Preprocessingis active.(2)Input DirectorySelect the dataset directory that contains one subfolder per case. For the expected folder layout, see Expected data structure.
(3)ThreadsChoose how many case folders to process in parallel. More threads can reduce runtime but use more memory.
(4)Imaging ModalitySelect the modality of the input image series or image file set. All cases processed in one run should belong to the same modality.
(5)Start FolderandStop FolderLimit processing to a numeric folder range. This only works when the case folders have integer names.
(6)List of FoldersProcess an explicit comma-separated set of folders such as
1, 5, 10or mixed names such aspatient_A, patient_B. If neither(5)nor(6)is set, Z-Rad processes every subfolder in the selected input directory.(7)Output DirectoryChoose where to save processed images and masks. Z-Rad creates the directory if needed.
(8)Data TypeChoose whether the input dataset is DICOM or NIfTI. This selection controls which additional preprocessing fields become visible.
(9)Resample ResolutionSets the target voxel spacing in millimetres.
(10)Mask UnionCombines all selected masks into a single union mask in addition to the individually saved masks.
(11)Image InterpolationSelect the interpolation method used for the image volume. The GUI exposes nearest-neighbour, linear, B-spline, and Gaussian interpolation.
(12)Resample DimensionControls whether resampling is performed slice-wise in
2Dor volumetrically in3D.(13)Mask InterpolationSelect the interpolation method used for masks. When a method other than nearest-neighbour is selected, Z-Rad shows an additional threshold field that converts interpolated values back into a binary mask.
(14)RUNStarts preprocessing with the currently selected parameters.
DICOM input#

Additional options shown when the input data type is DICOM.#
For DICOM workflows, the Data Type selection (8) exposes the following
controls:
(8.1)StructuresEnter the ROI names from RTSTRUCT files or
SegmentLabelvalues from DICOM SEG files to process.(8.2)All structuresProcess every non-empty structure available in the RTSTRUCT or SEG file.
(8.3)Convert to NIfTI without resamplingExport the DICOM image and selected structures as NIfTI files without changing voxel spacing.
NIfTI input#

Additional options shown when the input data type is NIfTI.#
For NIfTI workflows, the Data Type selection (8) exposes:
(8.4)NIfTI MasksEnter one or more mask filenames without file extensions.
(8.5)NIfTI ImageEnter the image filename without file extension.
Missing masks or structures are skipped rather than terminating the run.
Outputs#
Z-Rad creates one subfolder per case in the output directory. Each contains
image.nii.gz and the processed masks named after their structures, such as
GTV-1.nii.gz. Use this directory as input for the next processing tab, with
image as the NIfTI image name. See GUI quickstart for the complete
workflow.
Resampling and saved settings#
See Resampling guidelines for help choosing the target spacing, dimension, image and mask interpolation, and mask threshold.
2Dresampling preserves the original slice spacing in the third axis.CT images are rounded and stored as signed 16-bit integers after resampling.
MR and PET images remain floating-point volumes.
Input configurations can be saved from the GUI and later reloaded for reproducible reruns (
File -> Save/Load InputorCtrl+S/Ctrl+O).
For configuration examples, see Preprocessing in GUI.